The oversight section emphasizes the importance of regular reporting, tracking metrics, and conducting reviews throughout the testing process. This helps maintain quality control and provides valuable insights for continuous improvement.
Search For A Test
Prerequisite
- You shall know the overall functionality of the test case that you are looking for
Search through the application/project functional hierarchy
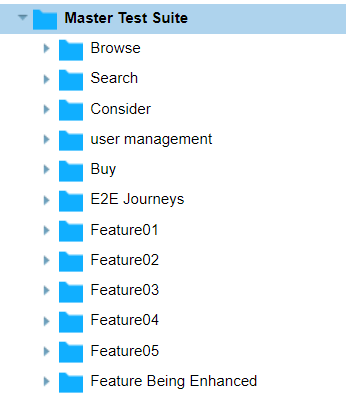
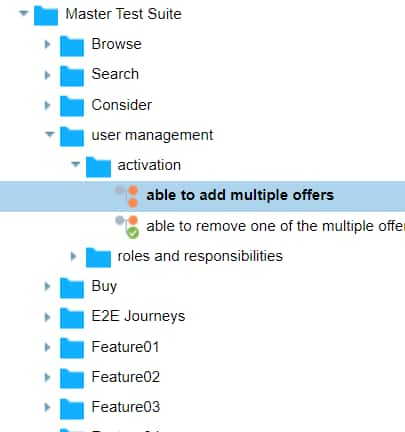
- Go to the master test suite in the Test Design section of qTest
Navigate through the application/project feature set and reach the appropriate feature/sub-feature
- Explore the tests in the folders to see if you can find the desired test
Search through the keywords
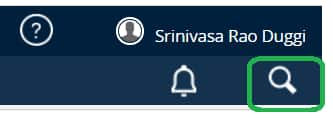
- Go to the master test suite in the Test Design section of
 qTest
qTest - Click the search icon on the top right corner
Observe a search slide bar appear. Enter the keyword of the test you are looking for and press enter
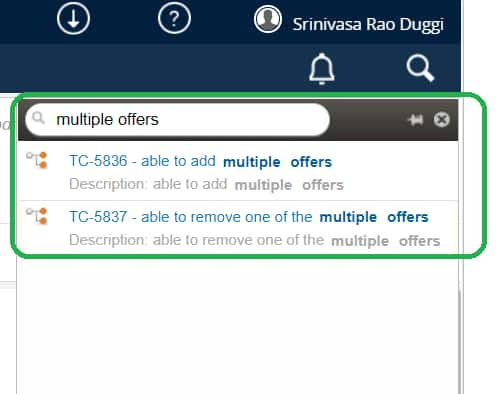
- Navigate through the search results and verify if the desired test can be found
Demonstration

Update An Existing Test Case
Prerequisite
- You have already identified the test to update
- If you need to search for a test to update follow the How Do I? - Test Cases | Search For A Test
An update to an existing test is needed in one of the following cases
- Case 01: The Requirement, which is covered by the test, is updated/changed/modified
- Case 02: The test can cover an additional Requirement by adding additional steps and verifications. To avoid duplication of steps, you want to update the test.
- Case 03: update the E2E test case
Process to update a test case
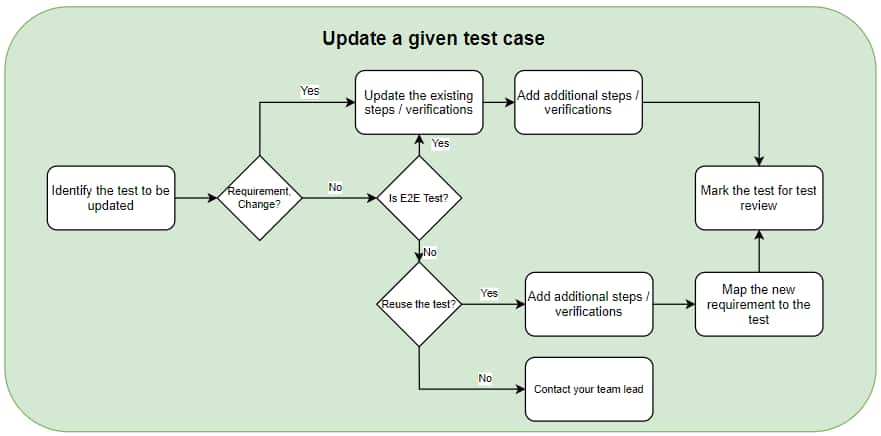
Case 01: Change in the Requirement
- Go to the test in the master test suite in the Test Design tab of qTest
Observe that you can see the existing test steps and verifications
Use the in-line editors to update the existing steps
To add additional steps/verifications click ADD and add the steps
Save the changes and mark the test for review
Change the status of the test to ‘Ready for Review’ and change ‘assigned to’ to your test lead
- Demonstration
Case 02: Reuse existing test to cover additional requirements
- Go to the test in the master test suite in the Test Design tab of qTest
To cover the additional requirement, we need to add additional steps and verifications
- To add additional steps/verifications click ADD and add the steps
Link the new requirement to the test using How Do I? - Requirements | Link an Existing Test to a Given Requirement
- Save the changes and mark the test for review
Change the status of the test to ‘Ready for Review’ and change ‘assigned to’ to your test lead
Case 03: Update an E2E test case
- Go to the test in the master test suite in the Test Design tab of qTest
Observe that you can see the existing test steps and verifications
Use the in-line editors to update the existing steps
To add additional steps/verifications click ADD and add the steps
Save the changes and mark the test for review
Change the status of the test to ‘Ready for Review’ and change ‘assigned to’ to your test lead
- You have updated the test successfully
Create A New Test Case
Before you write a new test
- Search if an existing test covers the scenario using How Do I? - Test Cases | Search For A Test
- If an existing test covers the scenario, link the existing test to the requirement using How Do I? - Requirements | Link an Existing Test to a Given Requirement
- If you need to update a test [add additional steps / verifications ] to cover the new scenario, update test using How Do I? - Test Cases | Update An Existing Test Case and link the updated test to the requirement using How Do I? - Requirements | Link an Existing Test to a Given Requirement
- For creating test cases for a given requirement How Do I? - Requirements | Create Test Cases for a Given Requirement
Creating a new test for a given requirement
Prerequisite
- You should be aware of the requirement for which you are writing the test
- Select the requirement in the application/project feature set - in the qTest requirements tab
You can see the ‘Create Associated Test Cases’ section on the right pane
Add the test names along with the description of tests and click create [you may create as many tests as you wish to]. Click Save
Observe that the tests are added to the linked test cases
Observe that the tests are reflected in the test design tab
- the requirement is linked to the tests
Add the test steps to the test cases
Fill the test case properties as required
- Save the test case, change the status of the test to ‘Ready for Review’ and change ‘assigned to’ to your test lead
- Test cases for the given requirement are created!
Create An End-to-End Test Case
Before you write a new end-to-end test
- Search if an existing test covers the scenario using How Do I? - Test Cases | Search For A Test
- If you need to update a test [add additional steps / verifications ] to cover the new scenario, update the test using How Do I? - Test Cases | Update An Existing Test Case
Creating a new end-to-end test case
Prerequisite
- You should be aware of the user journey flow for the E2E test
- Go to the Master Test Suite and navigate to the E2E journey hierarchy in Test Design of qTest
Right click on the folder and select New Test Case
Give an appropriate name to the test title - The test name shall reflect the user journey
- Fill the test case properties as required
- Add the Test steps and verifications
Save the test case, change the status of the test to ‘Ready for Review’ and change ‘assigned to’ to your test lead
You have successfully created an E2E test case